Azure File Share Data Sources
Azure File Share imports documents from one or more Azure file shares into a Siesta AI Data collection. It works with both Siesta AI SaaS and private instances. Siesta AI reads the Azure copy; it does not connect directly to your Windows server.
The flow has three steps: mount the Azure share on Windows → copy the selected documents and their access permissions → connect the share to Siesta AI. Siesta AI then discovers and processes the documents so an agent with the collection can use them in answers. If your documents are already in Azure Files, start at step 3.
Before You Start
You need:
- an Azure Storage Account with an SMB file share and network access from the copying computer, including outbound TCP port 445;
- an account that can read the selected Windows files and their permissions, and write files and set permissions in the Azure destination;
- a compatible Azure Storage Account connection in Siesta AI;
- permission to create a Data collection and assign it to an agent.
Use a dedicated share for documents intended for this collection. Siesta AI reads the whole share, including subfolders; the source cannot be restricted by entering a folder name in File Shares.
Choose the documents
Start with a few representative files. Leave out drafts, outdated documents, temporary files, and content for a different audience. Review subfolders too: the copy commands include them. The commands exclude junctions with /XJ; separately inspect other symbolic links and reparse points and explicitly exclude any that could lead outside the intended document set before running the commands. Preserve the originals on the Windows server.
1. Mount the Azure Share on Windows
- In Azure Portal, open Storage Account → File shares, select your share, and choose Connect.
- Select Windows, choose a free drive letter such as
Z:, and use the authentication method prepared by your administrator. - Open an ordinary PowerShell window on the Windows computer that holds the documents. Do not use Run as administrator for this mount. Review and run the connection command generated by Azure Portal.
- Open File Explorer and confirm that the share appears as a network drive. Keep the same Windows user and PowerShell session for the copy in step 2.
Windows drive mappings belong to a logon session. A share mounted in an elevated session may be invisible in ordinary File Explorer. See Microsoft's mounting guide and SMB connectivity troubleshooting.
If the connection fails, check the storage endpoint, TCP port 445, and the configured authentication with your administrator. Do not paste a Storage Account key into documentation, support messages, or Siesta AI source fields. An account key grants broad storage access; keep any generated connection command containing it private.
2. Copy the Documents and Their Permissions
Review and run the Robocopy commands
The commands below are visible and editable before execution. Run them in the same ordinary PowerShell session used for mounting. Replace the example source and destination paths; use a dedicated destination folder within the share.
First preview the copy. /L lists the proposed operations without copying files or changing permissions:
$source = 'D:\Approved documents'
$destination = 'Z:\Windows import'
$previewLog = Join-Path $env:TEMP 'siesta-robocopy-preview.log'
$copyLog = Join-Path $env:TEMP 'siesta-robocopy-copy.log'

if (-not (Test-Path -LiteralPath $source -PathType Container)) {
    throw 'The source folder does not exist. Check its path before continuing.'
}

robocopy $source $destination /E /COPY:DATS /DCOPY:DAT /SECFIX /XJ /R:2 /W:1 /MT:16 /TEE "/UNILOG:$previewLog" /L
if ($LASTEXITCODE -ge 8) {
    throw "Robocopy preview failed. Review $previewLog before continuing."
}
Review the listed paths and preview log. After confirming that the selected documents and destination are correct, run the copy:
robocopy $source $destination /E /COPY:DATS /DCOPY:DAT /SECFIX /XJ /R:2 /W:1 /MT:16 /TEE "/UNILOG:$copyLog"
$copyExitCode = $LASTEXITCODE
if ($copyExitCode -ge 8) {
    throw "Robocopy failed with code $copyExitCode. Review $copyLog."
}
Write-Host "Robocopy finished with code $copyExitCode. Review $copyLog and verify the copied files and permissions."
| Option | What it does |
|---|---|
/E | Copies subfolders, including empty ones; does not delete extra destination files |
/COPY:DATS | Copies file data, attributes, timestamps, and access permissions (DACLs) |
/DCOPY:DAT | Copies directory data, attributes, and timestamps |
/SECFIX | Updates security on existing files even when their content is skipped |
/XJ | Excludes junction points; other symbolic links and reparse points still require source review |
/R:2 /W:1 | Retries a failed copy twice, waiting one second between retries |
/MT:16 | Uses 16 copy threads |
/TEE /UNILOG | Displays progress and writes a Unicode log |
These commands do not request backup mode (/B), copy ownership, or copy auditing information. The operator must already have the required access. For identity-based SMB authentication, setting destination ACLs requires appropriate share-level permissions, such as Storage File Data SMB Share Elevated Contributor, and appropriate file/directory ACLs. If access is denied, have the administrator correct the copying account's permissions; do not remove ACL copying just to make the transfer finish. See Azure Files permissions.
Robocopy exit codes 0–7 do not indicate a fatal copy failure, but can report differences or extra files that need review. Codes 8 and higher indicate failures. A preview cannot prove that an actual write or ACL change will succeed. After copying, review the log, compare file counts, open sample files, and compare their source and destination Properties → Security → Advanced settings. See the Robocopy reference.
Preserving Windows ACLs on Azure Files does not by itself prove that Siesta AI enforces the same permissions for each user. Verify identity mapping, collection access, and the effective access of an allowed and a restricted test user before sharing the collection. Do not treat a successful transfer as an authorization test.
Optional: mirror deletions
The default command keeps destination files even when they disappear from the Windows source. If the destination must exactly mirror the source, replace /E with /MIR in both the preview and copy commands above. Run the preview again and review every proposed deletion before the real run.
/MIR removes files and folders present only in the destination and can overwrite destination directory permissions. Use it only with a dedicated destination folder, verified paths, and a recovery copy. Never point it at a share or folder containing unrelated documents.
Copy a small sample manually
For a small sample that does not require preserving source permissions, copy files in File Explorer from the Windows folder to a dedicated folder on the mounted Azure drive. The originals stay on Windows. Do not assume that a File Explorer copy preserves the original ACLs; use the Robocopy procedure when permission preservation is required. Neither method creates a recurring synchronization job.
3. Connect the Share to Siesta AI
- Create a compatible Azure Storage Account connection.
- Open Data and create or open a collection.
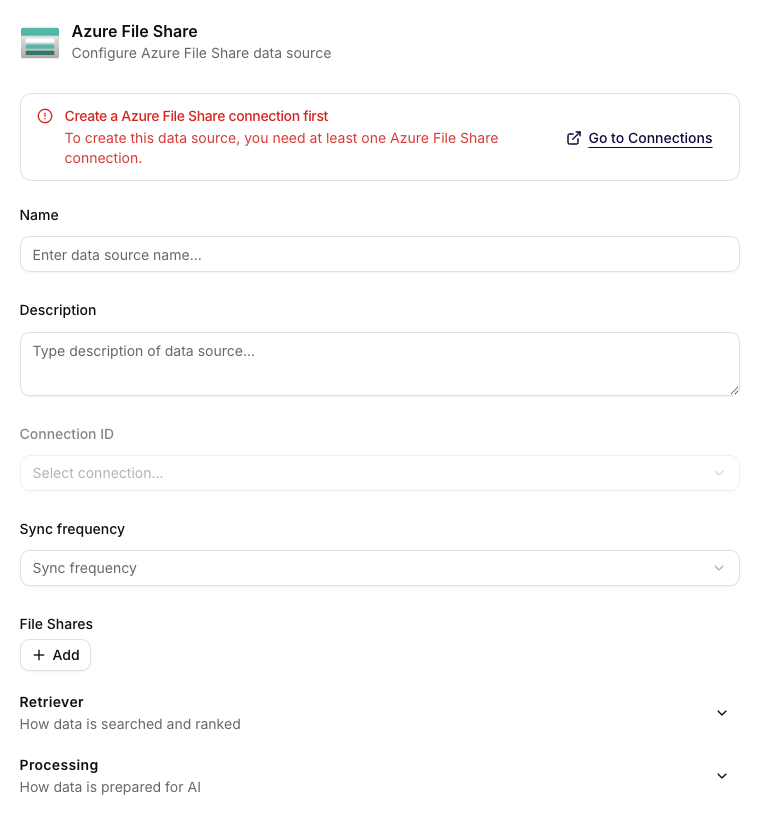
- Select Add data source → Azure File Share, enter a recognizable Name, and select the prepared Connection ID.
- Enter the exact share name under File Shares.
- Start with On Demand synchronization, review Processing, and create the source.
Source configuration
| Field | Value |
|---|---|
| Name | A recognizable name for the import |
| Description | Optional context about the files and their owner |
| Connection ID | The stored connection with access to the share |
| Sync frequency | On Demand, Daily, Weekly, or Monthly |
| File Shares | One or more exact Azure file-share names; at least one is required |
Credentials belong in the connection. Connection ID selects that connection; File Shares selects the shares to read.
File share names
For this Windows network path:
\\contosofiles.file.core.windows.net\approved-documents
enter only approved-documents in File Shares. A drive letter, UNC path, file path, or folder inside the share is not a valid share name. File path exclusions can exclude matching paths from future processing; changing an exclusion does not delete already indexed content.
Processing
Review the processing settings and allowed file types before creating the source. Enabling advanced PDF extraction adds processing costs.
Store source files, under Processing, is off by default. Enable it when users need original-file previews or downloads. It retains an additional copy of each original; supported documents can still be indexed and used in answers when it is off. See Store Source Files.
JSON fields
JSON Features and JSON Metadata Definitions are settings for imported JSON files. They contain names of fields within those JSON records. Leave both lists empty for ordinary PDF, Word, Excel, PowerPoint, and text documents. Do not create a separate JSON manifest for those documents.
Configure JSON imports using JSON Features and JSON Metadata Definitions, then test representative records before a larger import.
Check the first import
Creating a source starts discovery. With Auto-process discovered files off, review the update under Overview → Updates and approve it before indexing. If the result is Waiting for confirmation, processing has not yet been approved. See Discovery Mode.
After processing finishes, inspect Files for the expected documents and extracted content. Assign the collection to a test agent and ask questions whose answers you can check against the source. Verify access with allowed and restricted test users before wider use.
A completed Azure transfer does not mean that documents are ready in Siesta AI: discovery, any required approval, and processing must also finish. Use Processing, Sync, and Troubleshooting for missing files or failed processing.
Synchronization and Deletion
Keep the documents up to date
There are two independent schedules:
| Transfer | How it runs |
|---|---|
| Windows → Azure Files | Repeat the copy manually, or have your administrator configure a scheduled copy job or synchronization service |
| Azure Files → Siesta AI | Sync frequency: On Demand, Daily, Weekly, or Monthly |
Finish the Windows-to-Azure transfer before starting Siesta AI synchronization. The commands on this page perform a single copy; they do not schedule later runs. If using Azure File Sync, agree where files may be edited and how deletions are handled, because changes can travel in both directions.
Test a changed document, an ACL-only change, and a deleted document. Check Azure first, then the collection after synchronization and processing. The default /E copy does not propagate source deletions to Azure. Separately confirm whether indexed content and any stored original have been removed from Siesta AI; deletion in Windows or Azure alone is not proof of deletion in the collection.