Webhooks
The Webhooks tab is used to manage webhooks that allow Siesta AI to connect with external systems and applications. A webhook provides a unique URL address to which an external service can send HTTP requests, thereby triggering or influencing the behavior of the system.
You can find webhooks in the left application menu under Webhooks.
Each webhook:
- has its own name,
- is associated with a specific API key,
- can be active or inactive,
- has a unique URL address.
Webhooks are often used as triggers for Workflows that can be initiated from external systems.
The current dev model treats webhook calls as API-key protected server-to-server traffic. Knowing the webhook URL alone is not enough; the caller should also use the API key associated with that webhook.
Overview of Webhooks
On the main screen of the Webhooks tab, a list of all created webhooks is displayed in a table.
Displayed columns:
- Name – the name of the webhook entered by the user
- URL – automatically generated URL address of the webhook
- Status – current status of the webhook (Active / Inactive)
- Actions – additional management options for the webhook (e.g., edit)
At the top of the page, you can find:
- webhook search,
- the Add Webhook button.

Creating a New Webhook
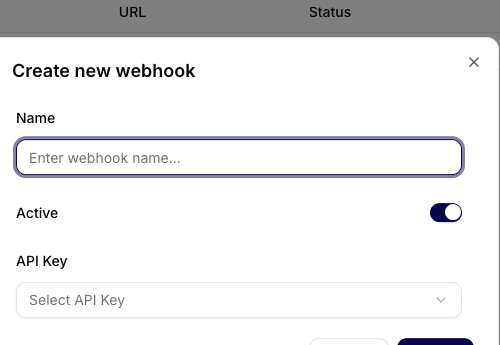
Clicking on Add Webhook opens a dialog for creating a new webhook.
Form Fields
- Name – a required field for entering the name of the webhook (e.g., Webhook)
- Active – a toggle that allows you to activate the webhook upon creation or leave it inactive
- API Key – selection of the API key that will authorize the webhook (e.g., API key for my python script)
Actions
- Cancel – closes the dialog without creating the webhook
- Create – creates a new webhook and generates its URL
Webhook Details
Open a specific webhook from the table to review its details.
Displayed information:
- name of the webhook,
- status (active / inactive),
- URL of the webhook – a unique address that can be copied with one click,
- API key relationship – the selected API key that authorizes the caller.
From the webhook detail, you can:
- edit the webhook settings,
- change its active status,
- use the webhook URL in external applications or in Workflows.

Webhook Status
The status of the webhook determines whether it is ready to receive requests:
- Active – the webhook is on and available
- Inactive – the webhook is off and requests are not processed
The status is visible both in the overview of webhooks and in the webhook detail.
Troubleshooting
If an external system cannot trigger a webhook:
- Open the webhook detail and confirm that the webhook is Active.
- Copy the URL again from the detail page to avoid using an outdated address.
- Confirm that the selected API key is still valid and that the caller is using the intended server-side authentication flow.
- Check whether the external system sends the expected HTTP method and payload.
- If the webhook starts a workflow, open the workflow and inspect the trigger and first node.
- Use Logs and Tool Executions to confirm whether a downstream action failed after the webhook was received.
If you rotate or delete the API key associated with a webhook, update the external system immediately.
Typical Use Cases for Webhooks
Webhooks are primarily used for:
- integrating Siesta AI with external applications,
- triggering automated processes,
- connecting custom scripts (e.g., Python),
- transferring data between systems in real-time.
Summary
Webhooks in Siesta AI provide a simple and secure way to connect the platform with external systems. With clear management, linkage to API keys, and the ability to activate or deactivate, webhooks can be easily monitored and managed. If you use a webhook as a trigger, we recommend linking its use to Workflows.
Related Guides
- Admins: Set Up Tools, APIs, and MCP Access
- Admins: Prepare Agents and Workflows for Teams
- Users: Create Useful Workflows