Microsoft Entra ID App Registration
Create a Microsoft Entra ID app registration for Microsoft sign-in in your private Siesta AI deployment. Add redirect URIs for the clients you use and permissions for the Microsoft 365 connectors you enable.
Administrator Setup Journey
- Prepare the deployment URL, tenant, and required clients.
- Register the application and record its IDs.
- Configure the web callbacks, then the mobile, Windows, or macOS clients you use.
- Add the required Microsoft Graph permissions and grant consent.
- Configure the server credential and verify the first user's journey.
Black rectangles hide identifying values; field labels and navigation remain visible. The portal examples show an existing registration, not a complete configuration to copy.
Before You Start
You need an Entra administrator who can create an app registration, configure Microsoft Graph permissions, and grant admin consent.
Prepare:
- the Siesta AI web application URL, shown below as
<APP_BASE_URL>without a trailing slash; - the Directory (tenant) ID for your organization;
- a list of the clients and Microsoft 365 connectors you will use;
- whether you will synchronize Entra groups with Siesta AI.
Use Single tenant only (also labelled Accounts in this organizational directory only) for a single organization. Use a multi-tenant registration only if the deployment is configured to accept users from other tenants; an administrator in each participating tenant must grant consent.
Create the Registration
- Open Microsoft Entra admin center → App registrations → New registration.
- Enter a recognizable application name, such as
Siesta AI — Company. Under Supported account types, choose Single tenant only — your organization for a deployment used by one organization. - Leave the initial redirect URI empty and select Register.
- On Overview → Essentials, copy the Directory (tenant) ID and Application (client) ID into the deployment configuration. Do not use Object ID in place of the client ID.
- Open Authentication and add the platforms described below.
The tenant and client IDs must belong to your registration. Use placeholders when sharing documentation or support examples.
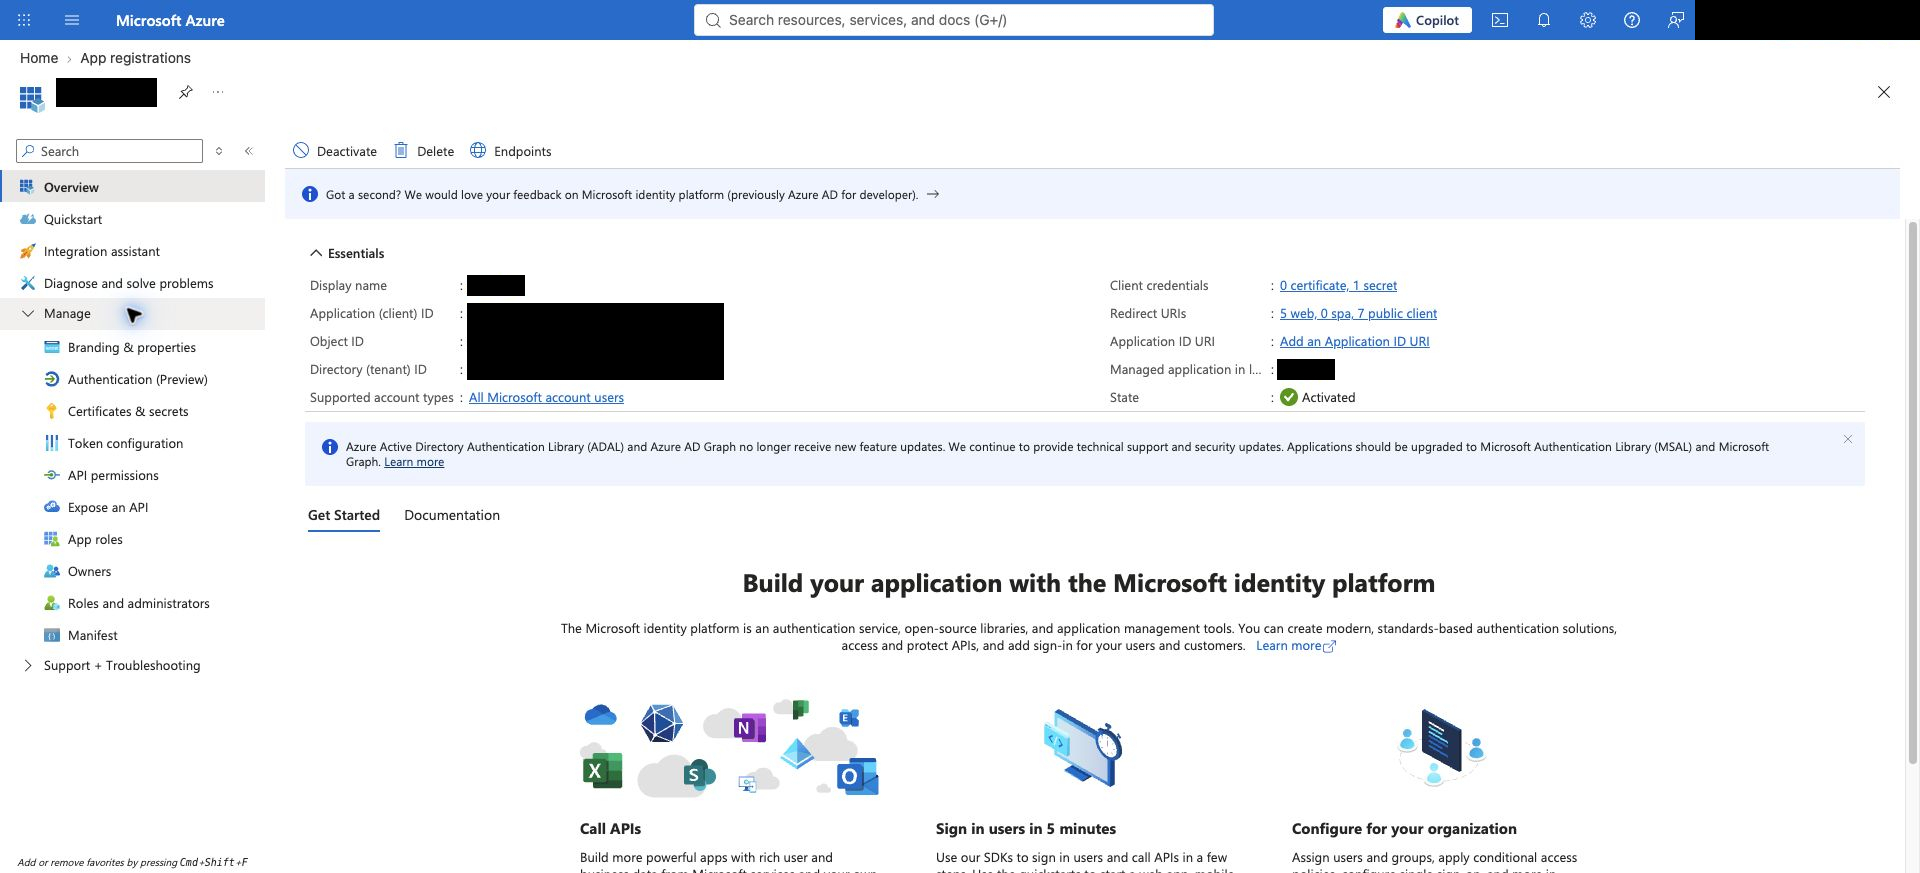
Open your registration's Overview to find the IDs. The screenshot shows an existing registration for navigation only; choose the account type for your own deployment as described above.
Web App and Browser Extension
- Open your application under App registrations and select Authentication (Preview) in the left menu.
- On Redirect URI configuration, select Add Redirect URI. In the classic interface, select Add a platform.
- Choose Web in the platform picker.
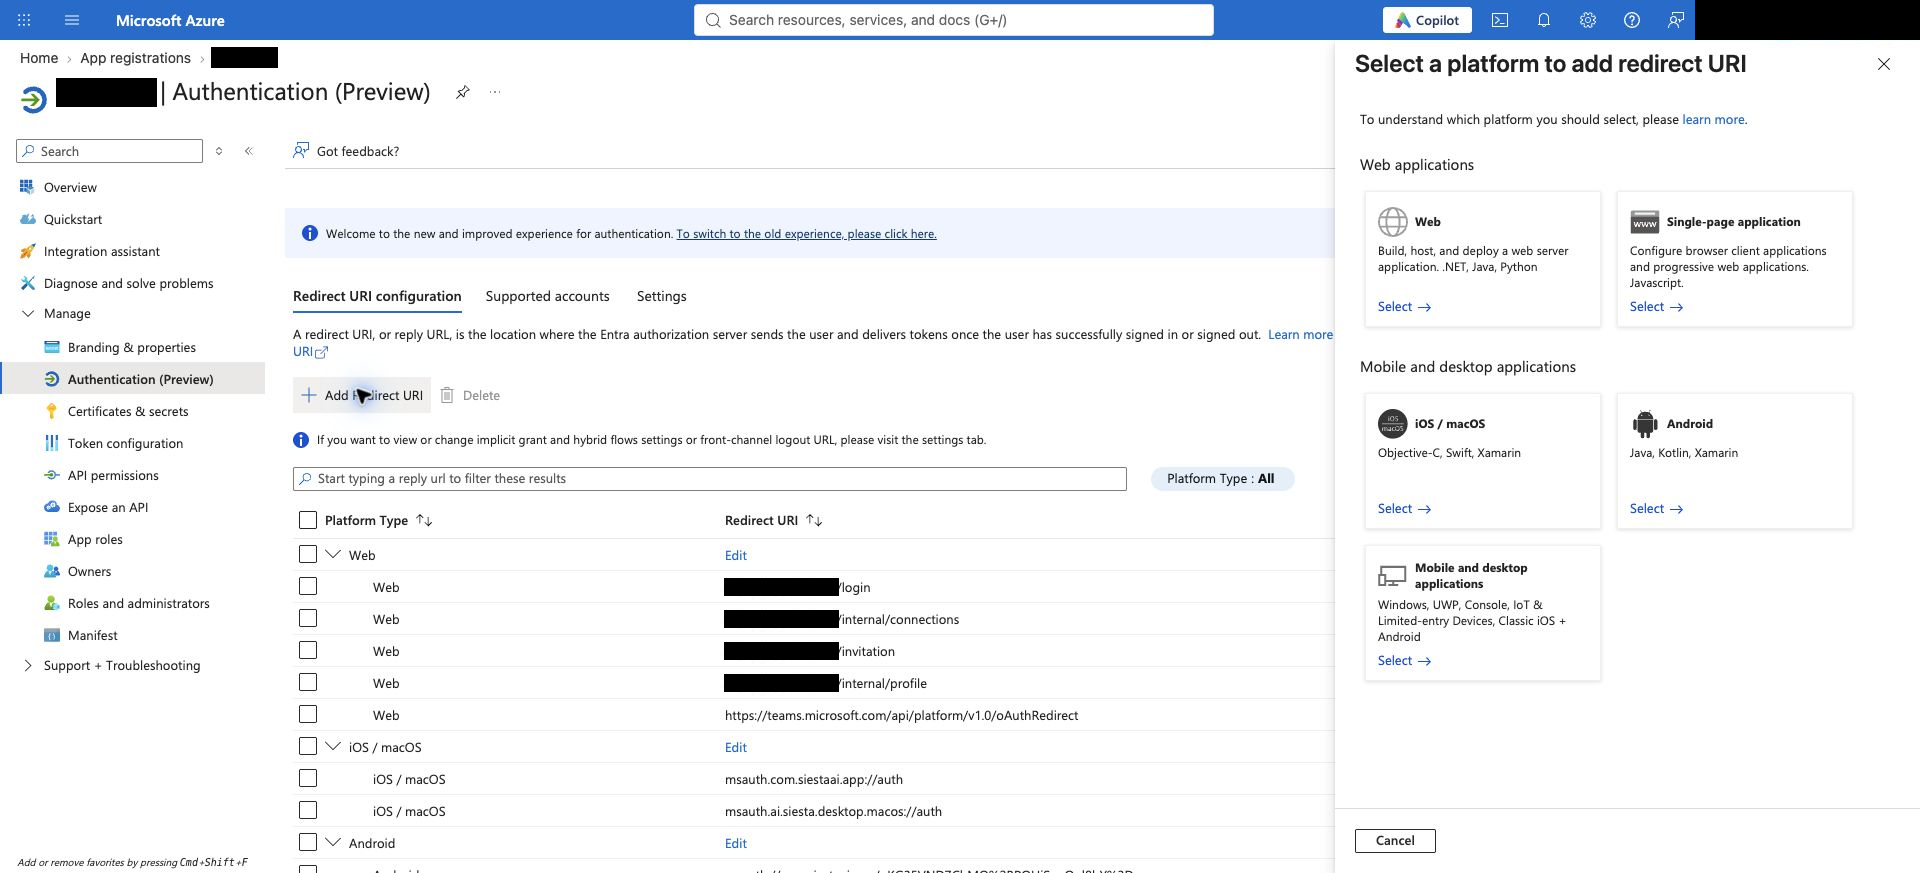
- Enter each complete callback URL in the Redirect URI field. A new row appears for the next URL. Replace the example domain with your own deployment domain.
- Select Configure, then check that every saved URI appears under Web in the list.
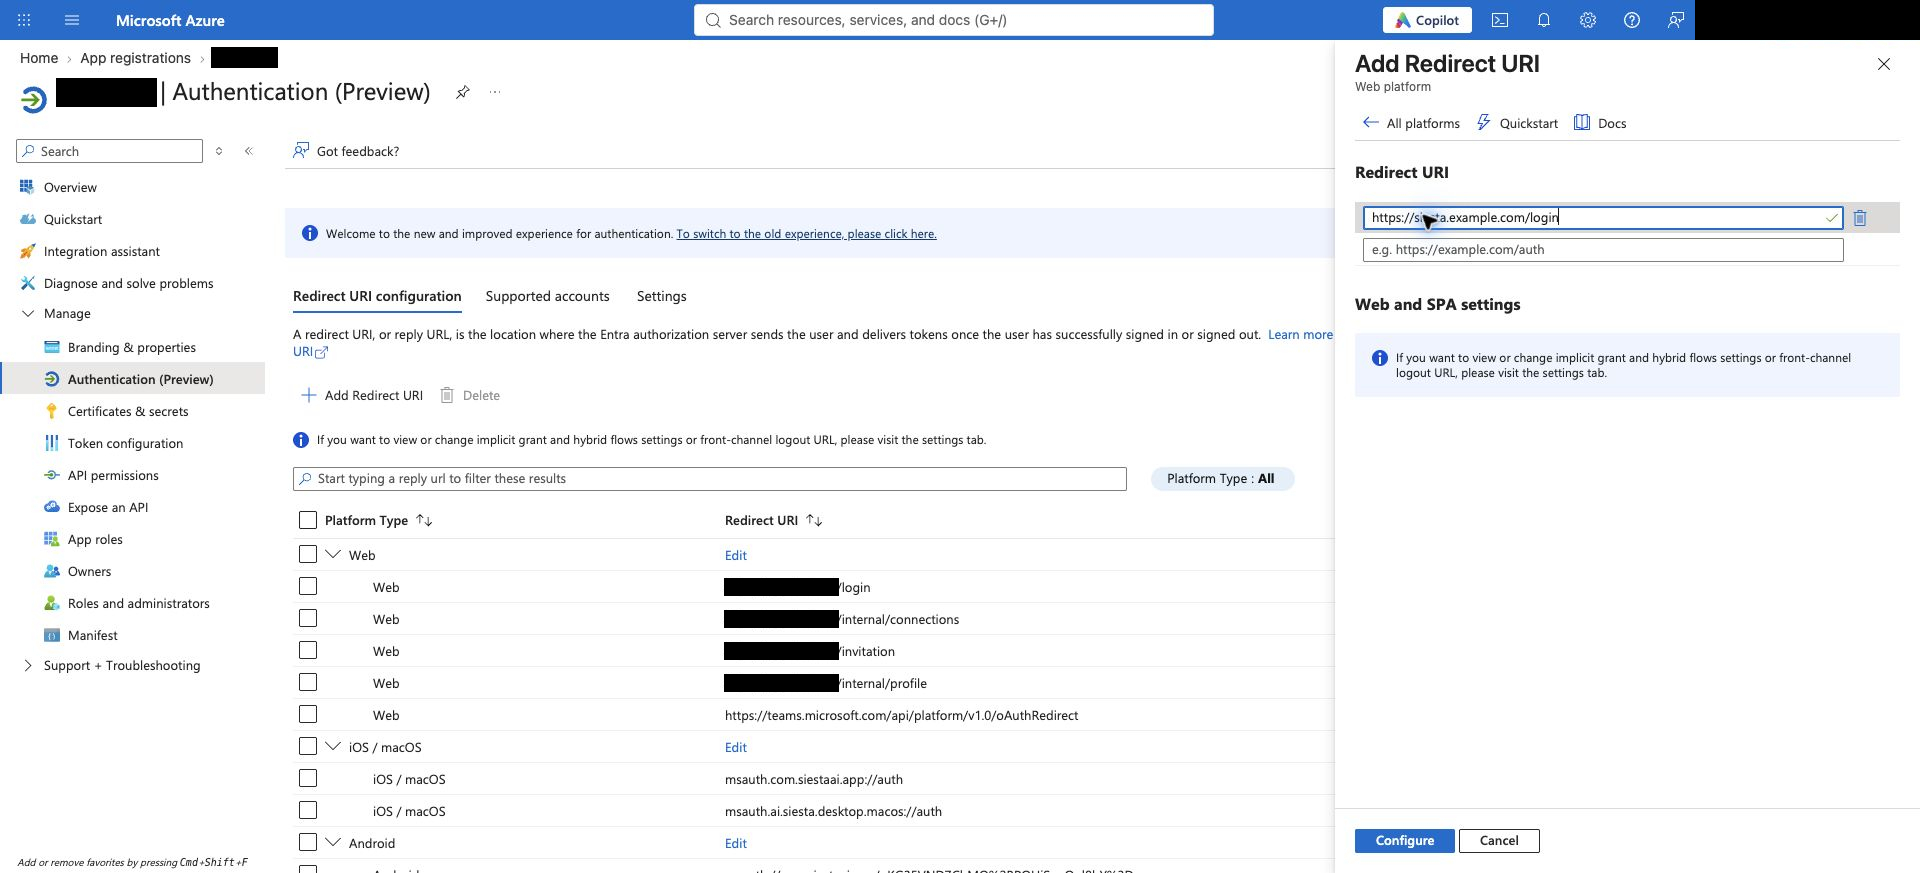
The example address https://siesta.example.com/login is illustrative. Use your deployment URL and add all applicable paths below.
Register these web callbacks:
<APP_BASE_URL>/login
<APP_BASE_URL>/invitation
<APP_BASE_URL>/internal/connections
<APP_BASE_URL>/internal/profile
For Entra group synchronization, also add:
<APP_BASE_URL>/internal/organization/settings/entra-callback
Replace <APP_BASE_URL> with the deployment's HTTPS web URL. Register each URI exactly, including the path and trailing-slash behavior.
The Chrome and Edge extensions use the web application's sign-in page. They do not need an additional Entra platform or extension-specific redirect URI.
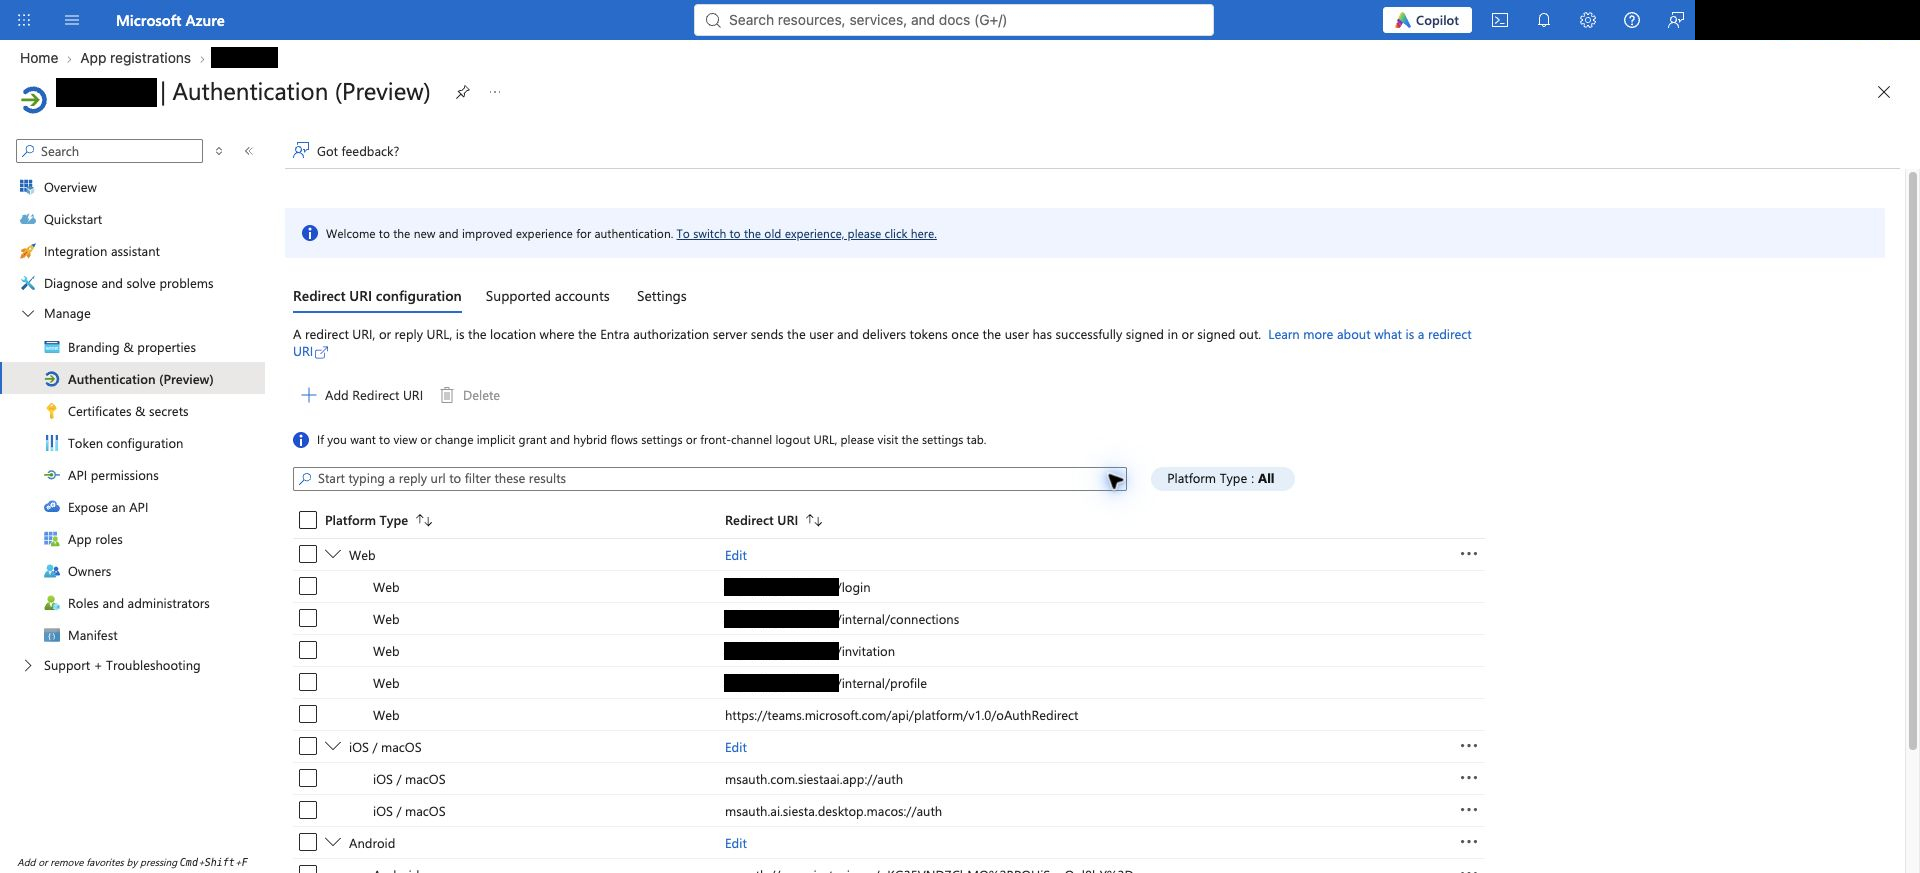
The Web rows should contain your deployment's HTTPS URL followed by the paths above. The full portal view also shows other enabled clients. Register only the callbacks required for your deployment; the extra Teams callback in this example is not required for the web application.
Mobile App for iOS and Android
Under Authentication → Add a platform, add the platforms for the published Siesta AI mobile app:
| Platform in Entra | Setting | Value |
|---|---|---|
| iOS / macOS | Bundle ID | com.siestaai.app |
| Android | Package name | com.siestaai.app |
| Android | Signature hash | qKG35VND7CbMO+PQHjSeuOol8bY= |
Select Configure to generate and save the redirect URIs. These identifiers belong to the published app; keep them unchanged for a private deployment.
Windows App
Under Authentication → Add a platform → Mobile and desktop applications, add this custom redirect URI:
http://localhost:23847/callback
The Windows App uses a temporary local callback listener and authorization code flow with PKCE. Keep the port and path shown above. Configure the client with the tenant and client IDs from your registration using the deployment's enterprise configuration.
macOS App
Under Authentication → Add a platform → Mobile and desktop applications, add this custom redirect URI:
msauth.ai.siesta.desktop.macos://auth
This callback belongs to the native macOS app, whose bundle ID is ai.siesta.desktop.macos. Enter the URI without a trailing slash. The app uses the deployment's enterprise configuration for its tenant and client IDs.
Microsoft documents custom desktop callbacks under adding redirect URIs.
API Permissions and Admin Consent
Open API permissions → Add a permission → Microsoft Graph → Delegated permissions. Add the sign-in permissions and only the connector permissions needed by your deployment:
| Capability | Delegated permissions |
|---|---|
| Microsoft sign-in and token refresh | openid, profile, email, offline_access, User.Read |
| SharePoint and OneDrive read access | Sites.Read.All, Files.Read.All |
| Outlook mail | Mail.ReadWrite, Mail.Send |
| Outlook calendar | Calendars.ReadWrite |
| Word and Excel file operations | Files.ReadWrite |
For SharePoint and OneDrive:
- Select Add a permission, then Microsoft Graph in the API picker.
- Choose Delegated permissions.
- Search for
Sites.Read.All, expand Sites if necessary, and select its checkbox. Repeat forFiles.Read.Allunder Files. - Select Add permissions to add the selected entries to the application.
- Back in Configured permissions, check both permission names and the Delegated type before granting consent.
These permissions let the connector act within the signed-in account's access; the account must also have access to the intended site, library, or folder.
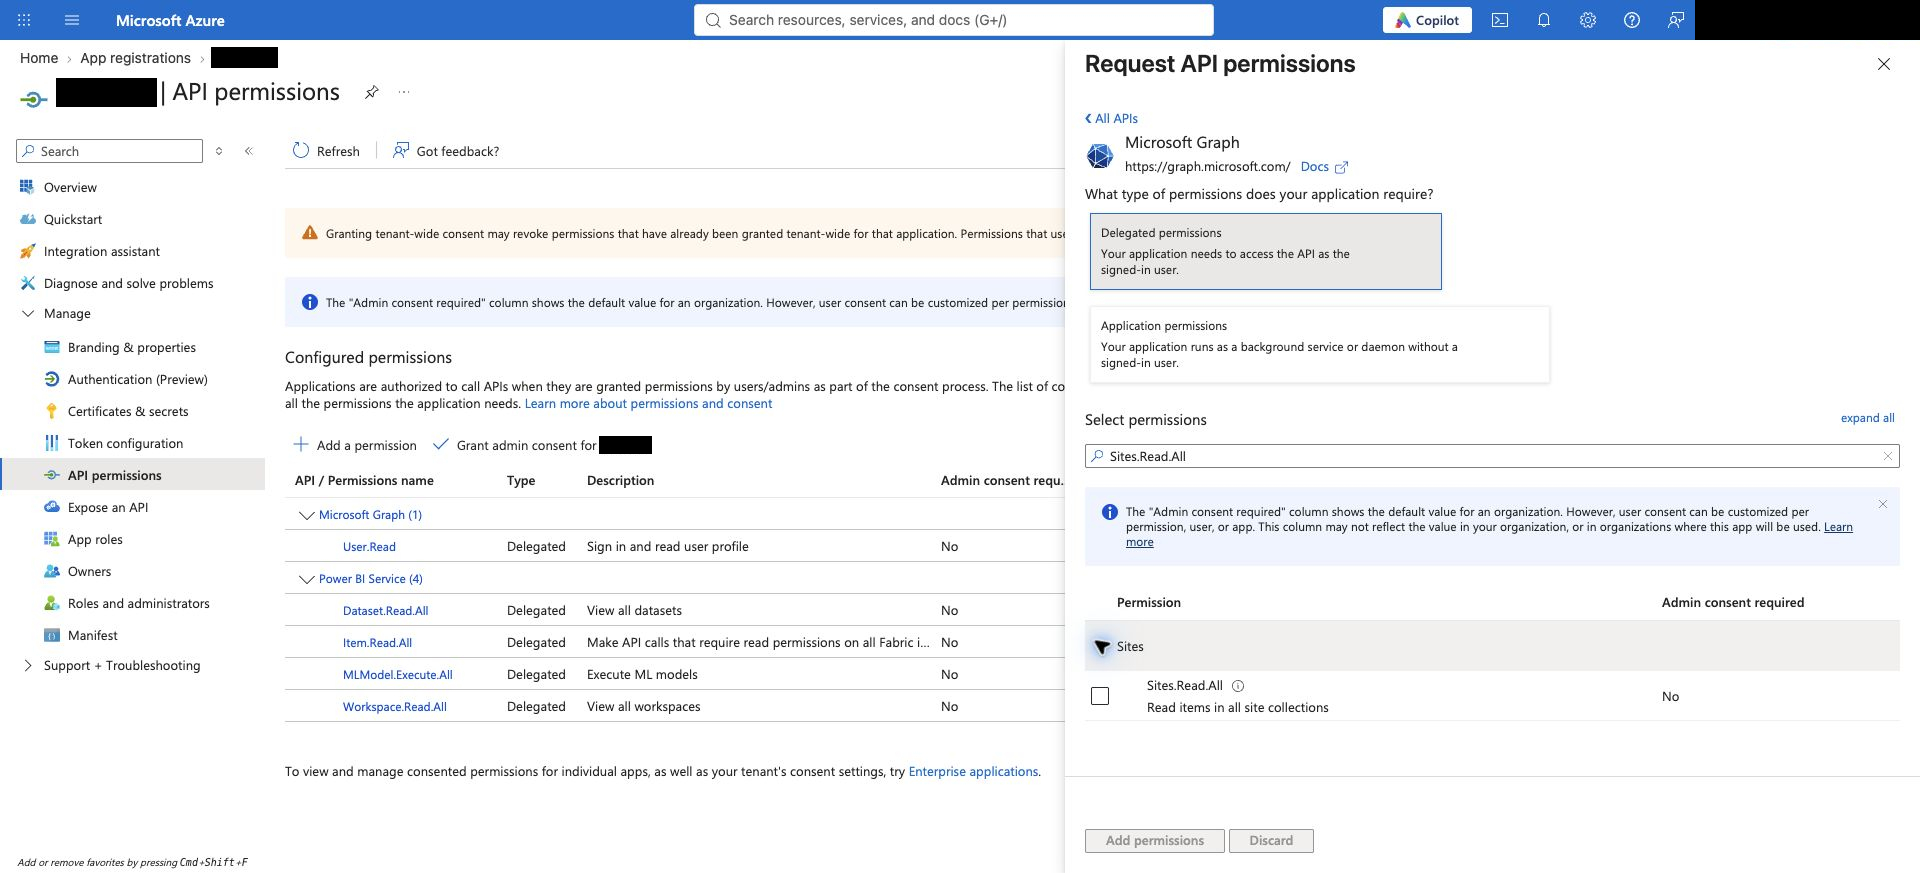
Search for each required permission, select it, and use Add permissions. This screenshot shows the permission picker, not a granted permission.
For Entra group synchronization, also add Microsoft Graph → Application permissions → Group.Read.All. This background operation requires a client secret, including when sign-in uses a certificate.
Select Grant admin consent for the tenant after checking the permissions. Review the confirmation and approve it only for the intended application and tenant. Then refresh the list and check the Status column for Granted for your tenant. Merely adding an entry to Configured permissions does not grant consent. For a multi-tenant deployment, obtain consent in each participating tenant.
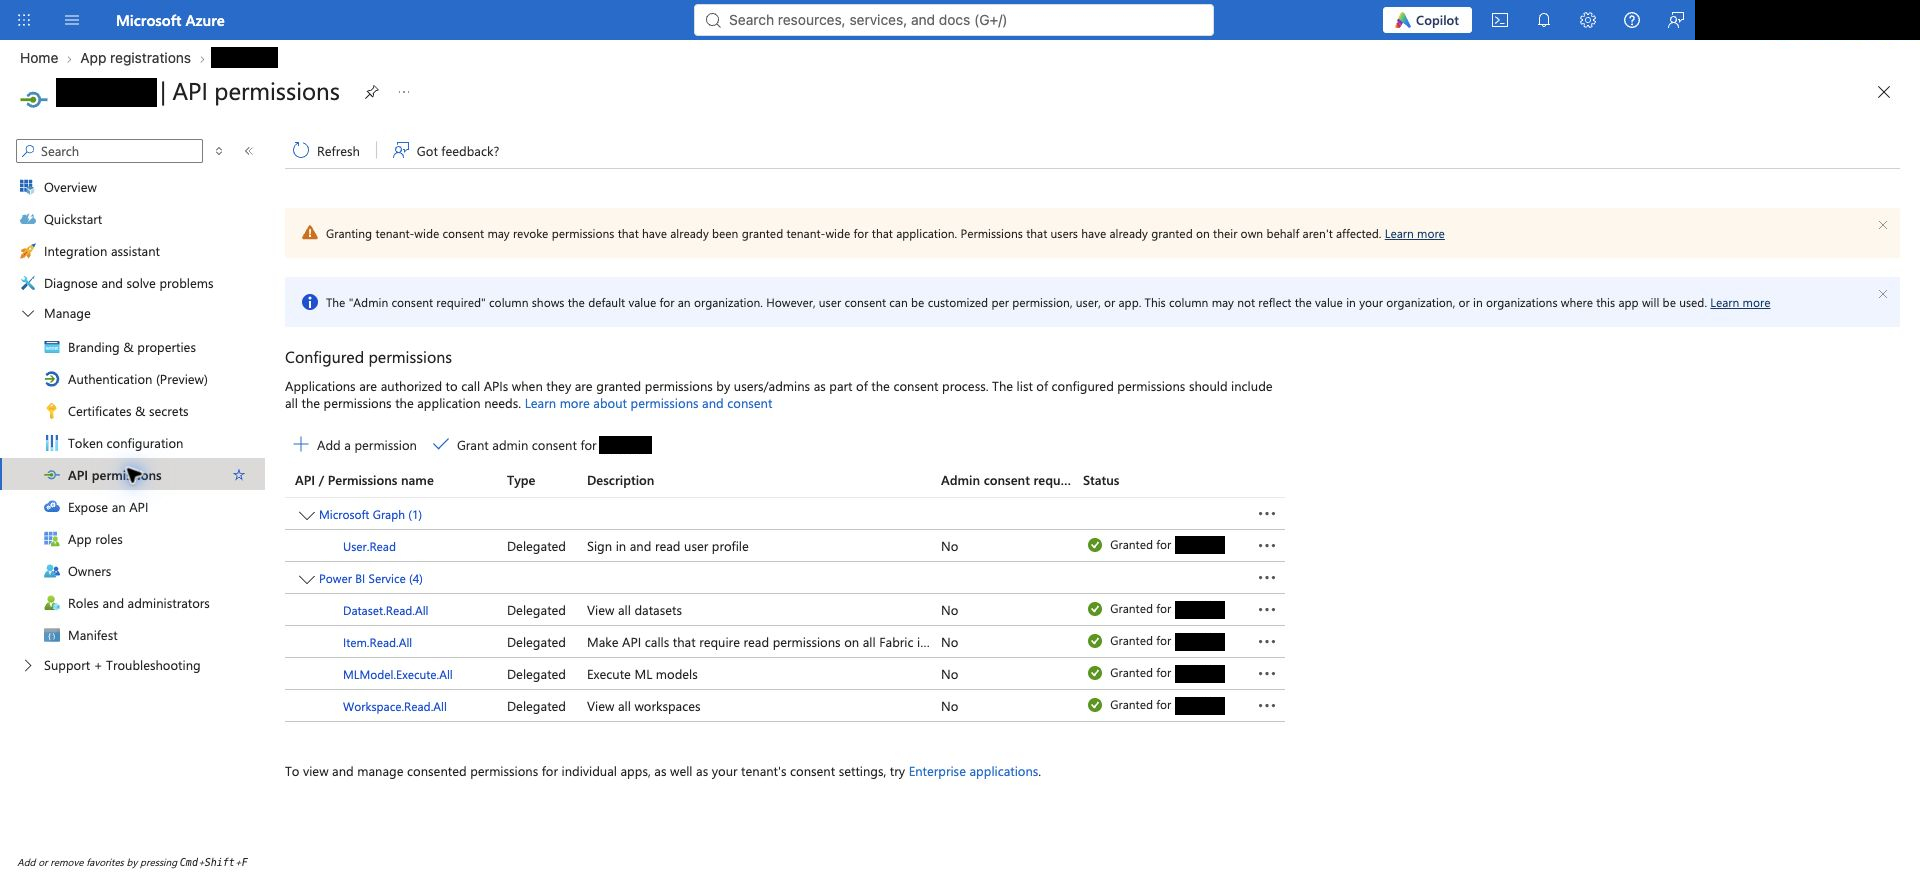
Use Add a permission and Grant admin consent for your tenant. This example shows where to check the Type and Status columns; it is not the complete permission list for SharePoint or OneDrive. Verify every permission required by the table above.
After consent, return to Siesta AI and create or reconnect the SharePoint connection or OneDrive connection. Then configure the separate SharePoint data source or OneDrive data source and verify a first import.
Configure Siesta AI onboarding separately in Organization Security. Granting Graph permissions does not assign Siesta AI roles, teams, or access to agents. See the Microsoft Outlook connection guide for Outlook capabilities.
Credentials
Configure the server-side credential supported by your deployment:
- Certificate: if supported, upload the public
.cerfile under Certificates & secrets → Certificates. Store its private key in the deployment's secret store. - Client secret: under Certificates & secrets → Client secrets, select New client secret and choose an expiry that meets your organization's policy. Copy the secret value, not its ID, into the deployment's secret store before leaving the page.
Entra group synchronization requires a client secret even if you also configure a certificate. Record the expiry and arrange rotation before it expires.
Keep secrets, certificate private keys, tokens, and authorization codes out of documentation, screenshots, and client configuration files. Desktop and mobile apps use the tenant and client IDs; do not distribute a client secret with them.
Verify the First User Journey
- Have the deployment administrator apply the tenant ID, client ID, and server credential to the private instance. Use the deployment's secret store for credentials.
- Configure Organization Security and the user's Siesta AI roles and team membership. If Assignment required is enabled for the Entra enterprise application, assign the pilot user or their group there as well.
- In a private browser window, open your Siesta AI web URL and choose Microsoft sign-in. Sign in as the pilot user from the intended tenant and complete any required MFA or Conditional Access steps.
- Confirm that sign-in returns to the same Siesta AI instance and that the user can open the intended agent. If admin approval appears, check the tenant and consent before retrying.
- For SharePoint or OneDrive, create or reconnect the connection using an account with access to the test documents. Import a small known folder and verify the documents in the data collection and an answer from the assigned agent.
- Repeat sign-in for each enabled desktop or mobile client. If group synchronization is enabled, run it and verify the expected memberships before inviting more users.
Ready for onboarding: the pilot can sign in, reach the correct instance and agent, and use the configured connector. Keep a record of the tested clients and credential expiry with the deployment handover.
Troubleshooting
| Symptom | Check |
|---|---|
| Need admin approval | Grant admin consent for the permissions requested by the enabled capabilities. |
| Request sent to your admin | In a multi-tenant setup, check consent in the user's home tenant. |
AADSTS50011 redirect mismatch | Compare the requested URI with the registered URI, including scheme, host, port, path, case, and trailing slash. |
| Windows sign-in does not return to the app | Check http://localhost:23847/callback and whether local security software blocks the callback listener. |
| macOS sign-in does not return to the app | Check the custom desktop redirect msauth.ai.siesta.desktop.macos://auth. |
| Group synchronization fails or returns no groups | Check application permission Group.Read.All, admin consent, the tenant ID, and an active client secret. |
| A user cannot sign in after consent | Check Enterprise applications → Properties → Assignment required, user assignments, and Conditional Access policies. |
| A permission is configured but not granted | Check Enterprise applications → Security → Permissions and grant the missing consent. |
Before onboarding users, test sign-in with a pilot account on each enabled client. Test one operation for each configured Microsoft 365 connector and, if enabled, run a group synchronization.